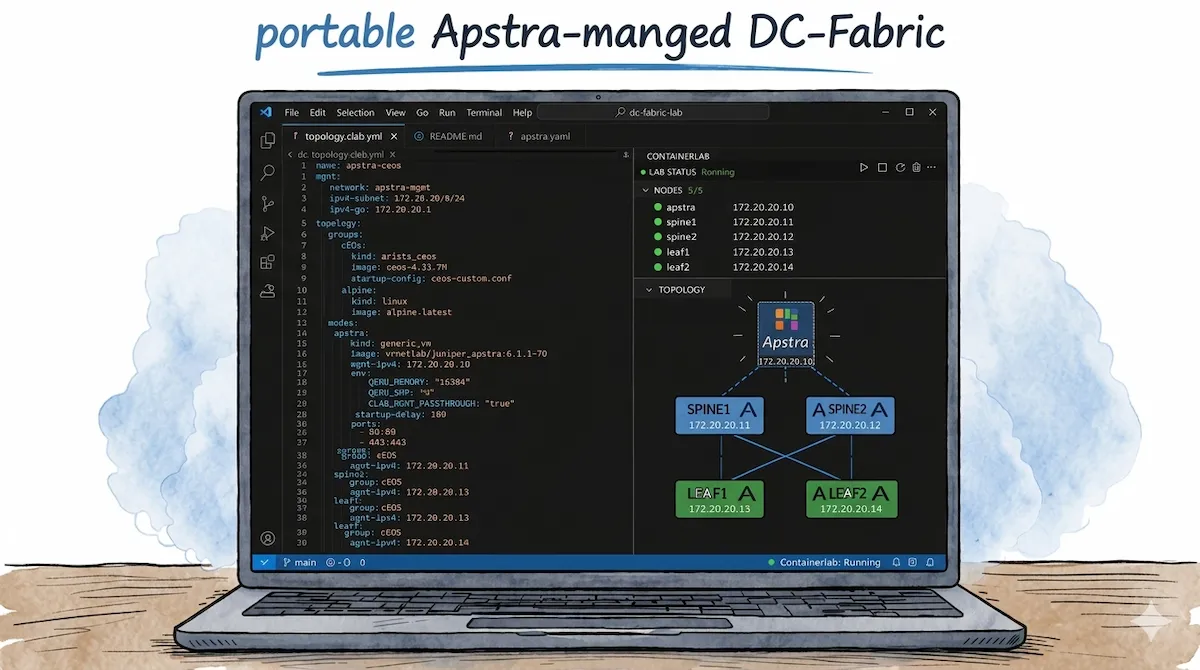
The Idea
Anyone who uses HPE Juniper Apstra as a multi-vendor management solution for data center networks knows that a dedicated test environment is essential. Very few people would likely want to test new features, system changes, or automation workflows on the production network.
In the best-case scenario, you can provision an additional Apstra server VM for these purposes on your in-house virtualization infrastructure. However, as long as it operates without actual “managed devices,” the insights gained are largely theoretical.
Of course, you could also use established network emulation platforms such as EVE-ng, GNS3, or Cisco CML to set up a lab based on virtualized components. However, since this endeavor is also tied to specific infrastructure requirements, such as bare-metal servers or sufficiently powerful hardware and their availability/accessibility, I would like to present another - more light-weight - approach in this blog post that allows you to run a complete Apstra-managed data center network, for example, even on your local laptop.
Apstra and Containerlab
In my opinion, the tool of choice for this use case is, once again, Containerlab. Since I described the setup of Containerlab on Windows in detail in one of my recent blog posts, the Containerlab WSL distro will also serve as the basis here.
However, while it was relatively easy to integrate individual container-based nodes into Containerlab in that blog post, integrating Apstra presents certain challenges. If you look at the currently supported “Node Kinds” in Containerlab, you’ll notice that Juniper Apstra isn’t listed directly.
In addition to the fully supported “Node Kinds” for specific vendor appliances, such as the VM-based Juniper vJunos Switch, the list also includes an entry named “Generic VM”. This node type is intended “to launch arbitrary VMs that are packaged in a container using vrnetlab” - and thus appears to be the tool of choice for the desired use case.
Containerlab vrnetlab Fork
To better understand the following steps, we first need to clarify what vrnetlab actually is and what role it plays in this whole endeavor. The aforementioned vrnetlab project - or, in this specific case, the vrnetlab fork by srl-labs ultimately ensures that VMs are packaged into Containerlab-compatible Docker containers. To this end, the project consists of a collection of build instructions and the necessary files (Dockerfile, Makefile, launch script) for a wide variety of appliances from different vendors.
If you have a supported VM image at hand (e.g., Juniper vJunos Switch or Cisco Cat9kv), clone the repository, simply move the image to the designated folder, and run the make command. The desired Docker container is then built and imported into the local image repository.
Upon closer inspection of the vrnetlab repository, however, it becomes apparent that there is no predefined folder for the Generic VM node type or anything similar. While there is a folder for Ubuntu, it can only be used for standard Ubuntu cloud images. If you place the Apstra VM image in this folder, the build process will fail.
After doing some research in the Containerlab Community Discord, it turned out that I was apparently the first and only person to come up with the idea of running Apstra as a node within Containerlab. Others who use Apstra in conjunction with Containerlab topologies prefer to start Apstra outside of Containerlab, for example as a native KVM VM on the Containerlab host (as described in this Juniper TechPost article). At this point, I realized two things - first, that I would probably have to create the necessary build instructions and files for Apstra myself - and second, that my idea of packing Apstra into the Containerlab topology might not be such a good idea after all 🤔.
Custom Apstra Build Folder
However, I remained convinced, that for certain use cases it would be advantageous to manage Apstra directly within the Containerlab topology. So I took a look at how vrnetlab is structured and how individual VM types could be configured there.
How vrnetlab Works
The basic structure of vrnetlab includes several base files that are used uniformly for all VM types and can be found in the root directory or the common folder. In addition, there is a specific build folder for each individual node type that contains the individual settings in the form of three files. This folder is typically located under the corresponding manufacturer directory.
vrnetlab/
├── makefile.include           <- Common Make targets for all node types (docker-image, docker-push, etc.)
├── makefile-sanity.include    <- Checks DOCKER_REGISTRY and sets the REGISTRY variable
├── common/
│   ├── vrnetlab.py            <- VM and VR base classes, QEMU lifecycle, health reporting
│   └── healthcheck.py         <- required for Docker health check
└── <vendor>/
    └── <vm-type>/
        ├── Makefile           <- VENDOR/NAME/IMAGE_GLOB/VERSION, including shared Makefiles
        └── docker/
            ├── Dockerfile     <- includes vrnetlab base image, copies “qcow2” and “launch.py”, exposes ports
            └── launch.py      <- Node-specific VM + VR classes, QEMU config, bootstrap_spin() script
The task was to create the necessary files for a new Apstra VM type and place them in the juniper vendor directory. For this purpose, however, I seeked the help of AI in the form of Claude. I lack both the necessary hands-on experience with Dockerfiles, Makefiles, and launch scripts, as well as familiarity with the specific vrnetlab logic.
AI as an Assistant
Claude immediately understood the task and objective from the very first prompt and was able to determine the basic required settings based on its knowledge of the Apstra documentation. However, as the process continued, it required a few additional prompts to adjust the instructions so that the created image could actually be started. Further prompts were then necessary to ensure, for example, that all required ports were exposed and that a persistent overlay image was created, which preserves the state of the VM even after the lab topology is shut down. There were also instances where Claude had gotten a bit “off track” and pursued unnecessarily complex approaches, so I had to briefly steer him back on course. I also noticed that Claude doesn’t always have access to the latest data, such as from the vrnetlab Github-repository or the Juniper documentation for Apstra. In such cases, it helps to provide him with this specific data directly via chat.
All in all, however, this approach achieved its goal, and I was able to put together a custom build folder for Juniper Apstra that created working Containerlab images. ✅
The process of getting there was also quite an experience for me, as I was able to learn a lot about how vrnetlab works and how to use AI for such projects. But now it was time to actually integrate the whole thing with other nodes in Containerlab.
Test
Since Apstra positions itself as a multi-vendor management solution for data center networks and also supports Arista switches in addition to Juniper and others, I wanted to set up a small data center fabric consisting of four Arista cEOS nodes, fully configured and monitored via Apstra, as the ultimate test. In this section, I will go through this process step-by-step.
Creating the Apstra Image
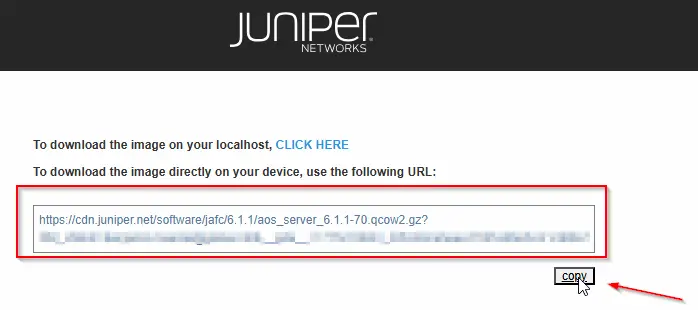
First, we’ll create the necessary Apstra Docker image using the Custom Apstra Build folder. To do this, we’ll download the desired Apstra version from the Juniper website in KVM/QCOW2 format (“Apstra VM Image for Linux KVM”). In my example, I am using Apstra v6.1.1.
To do this, we can use the direct link URL that Juniper provides in the last step of the download dialog:
cd vrnetlab/juniper/apstra/
wget -O aos_server_6.1.1-70.qcow2.gz "https://cdn.juniper.net/software/jafc/6.1.1/aos_server_6.1.1-70.qcow2.gz?<USER_SPECIFIC_CREDENTIALS>"
Next, the archive containing the KVM image must be extracted using gunzip, so that the Apstra build folder should then look like this:
gunzip aos_server_6.1.1-70.qcow2.gz

[*]─[LAPTOP]─[~/vrnetlab/juniper/apstra]
└──> ll
total 6623392
drwxr-xr-x 3 clab clab       4096 Apr  3 12:18 ./
drwxr-xr-x 9 clab clab       4096 Mar 14 12:18 ../
-rw-r--r-- 1 clab clab       1225 Mar 14 13:57 Makefile
-rw-r--r-- 1 clab clab      10010 Mar 24 08:56 README.md
-rw-r--r-- 1 clab clab 6782320640 Feb 24 17:23 aos_server_6.1.1-70.qcow2
drwxr-xr-x 2 clab clab       4096 Mar 21 12:14 docker/
Now the Docker image can be built using the make command, and you can use docker images to verify that the build process was successful:
[*]─[LAPTOP]─[~/vrnetlab/juniper/apstra]
└──> make
for IMAGE in aos_server_6.1.1-70.qcow2; do \
        echo "Making $IMAGE"; \
        make IMAGE=$IMAGE docker-build; \
        make IMAGE=$IMAGE docker-clean-build; \
done
Making aos_server_6.1.1-70.qcow2
make[1]: Entering directory '/home/clab/labs/vrnetlab/juniper/apstra'
--> Cleaning docker build context
rm -f docker/*.qcow2* docker/*.tgz* docker/*.vmdk* docker/*.iso docker/*.xml docker/*.bin
rm -f docker/healthcheck.py docker/vrnetlab.py
Building docker image using aos_server_6.1.1-70.qcow2 as vrnetlab/juniper_apstra:6.1.1-70
make IMAGE=$IMAGE docker-build-image-copy
make[2]: Entering directory '/home/clab/labs/vrnetlab/juniper/apstra'
cp aos_server_6.1.1-70.qcow2* docker/
make[2]: Leaving directory '/home/clab/labs/vrnetlab/juniper/apstra'
(cd docker; docker build --build-arg http_proxy= --build-arg HTTP_PROXY= --build-arg https_proxy= --build-arg HTTPS_PROXY= --build-arg IMAGE=aos_server_6.1.1-70.qcow2 --build-arg VERSION=6.1.1-70 --label "vrnetlab-version=$(git log -1 --format=format:"Commit: %H from %aD")" -t vrnetlab/juniper_apstra:6.1.1-70 .)
[+] Building 97.3s (8/8) FINISHED                                                                                                                                                                           docker:default
 => [internal] load build definition from Dockerfile                                                                                                                                                                  0.2s
 => => transferring dockerfile: 407B                                                                                                                                                                                  0.0s
 => [internal] load metadata for ghcr.io/srl-labs/vrnetlab-base:0.2.1                                                                                                                                                 0.0s
 => [internal] load .dockerignore                                                                                                                                                                                     0.1s
 => => transferring context: 2B                                                                                                                                                                                       0.0s
 => CACHED [1/3] FROM ghcr.io/srl-labs/vrnetlab-base:0.2.1                                                                                                                                                            0.0s
 => [internal] load build context                                                                                                                                                                                    48.5s
 => => transferring context: 6.78GB                                                                                                                                                                                  48.5s
 => [2/3] COPY aos_server_6.1.1-70.qcow2 /                                                                                                                                                                           37.3s
 => [3/3] COPY *.py     /                                                                                                                                                                                             0.1s
 => exporting to image                                                                                                                                                                                               10.8s
 => => exporting layers                                                                                                                                                                                              10.7s
 => => writing image sha256:d2e1e8d18d848d9d37fbc6935950029a6387a1c633737ca05c386c884ceb7c0b                                                                                                                          0.0s
 => => naming to docker.io/vrnetlab/juniper_apstra:6.1.1-70                                                                                                                                                           0.0s
make[1]: Leaving directory '/home/clab/labs/vrnetlab/juniper/apstra'
make[1]: Entering directory '/home/clab/labs/vrnetlab/juniper/apstra'
--> Cleaning docker build context
rm -f docker/*.qcow2* docker/*.tgz* docker/*.vmdk* docker/*.iso docker/*.xml docker/*.bin
rm -f docker/healthcheck.py docker/vrnetlab.py
make[1]: Leaving directory '/home/clab/labs/vrnetlab/juniper/apstra'

[*]─[LAPTOP]─[~/vrnetlab/juniper/apstra]
└──> docker images
REPOSITORY                             TAG             IMAGE ID       CREATED         SIZE
vrnetlab/juniper_apstra                6.1.1-70        d2e1e8d18d84   3 minutes ago   7.27GB
ceos                                   4.33.7M         20eaa262cad4   5 days ago      2.47GB
[...]
Topology Definition
Now that the Apstra container image is in place, we can proceed to define the Containerlab topology. In addition to the Apstra controller node, the lab consists of two Arista cEOS nodes each serving as spine switches and two cEOS nodes each serving as leaf switches. I’m also using two Alpine Linux nodes as test hosts, each connected to the leaf switches.
When defining the Apstra node, keep the following points in mind:
| Parameter:Value | Purpose |
|---|---|
kind:generic_vm | REQUIRED: We use the generic_vm node type for any VM-based nodes that do not have a specific node type defined |
image:vrnetlab/juniper_apstra:6.1.1-70 | REQUIRED: Here, we use the Docker image created in the previous step. |
mgmt-ipv4:172.20.20.10 | REQUIRED: Defines a static MGMT IPv4 address for the Apstra Node.
Info This MGMT IP must be set manually during the first boot using the First Boot Configuration Tool (aos-config) on the Apstra CLI. |
env:QEMU_MEMORY:"16384" | OPTIONAL: For my lab, I use 16 GB of RAM for the Apstra VM, which meets the manufacturer’s minimum recommendation and is also the default value specified by the vrnetlab build. |
env:QEMU_SMP:"4" | REQUIRED: The Apstra VM is allocated 4 vCPU cores, which meets the manufacturer’s minimum recommendation. |
env:CLAB_MGMT_PASSTHROUGH:"true" | REQUIRED: Ensures that the VM’s management interface is directly bridged to the management network, so that the VM itself can be directly addressed using the management IP address. |
startup-delay:180 | OPTIONAL: The Apstra VM is not started until after 3 minutes, so that the cEOS nodes have enough time to boot up beforehand. |
ports: 80:80 443:443 | REQUIRED: Expose the web server’s ports at the WSL host level so that I can access the Apstra web UI directly from Windows. |
Here is the resulting topology definition in Containerlab YAML format:
name: apstra-ceos

mgmt:
  network: apstra-mgmt
  ipv4-subnet: 172.20.20.0/24
  ipv4-gw: 172.20.20.1
topology:
  groups:
    cEOS:
      kind: arista_ceos
      image: ceos:4.33.7M
      startup-config: ceos-custom.conf
    alpine:
      kind: linux
      image: alpine:latest
  nodes:
    apstra:
      kind: generic_vm
      image: vrnetlab/juniper_apstra:6.1.1-70
      mgmt-ipv4: 172.20.20.10
      env:
        QEMU_MEMORY: "16384"
        QEMU_SMP: "4"
        CLAB_MGMT_PASSTHROUGH: "true"
      startup-delay: 180
      ports:
        - 80:80
        - 443:443
    spine1:
      group: cEOS
      mgmt-ipv4: 172.20.20.11
    spine2:
      group: cEOS
      mgmt-ipv4: 172.20.20.12
    leaf1:
      group: cEOS
      mgmt-ipv4: 172.20.20.13
    leaf2:
      group: cEOS
      mgmt-ipv4: 172.20.20.14
    host1:
      group: alpine
      mgmt-ipv4: 172.20.20.21
      exec:
      - ip addr add 10.1.100.10/24 dev eth1
      - ip route add 10.1.0.0/16 via 10.1.100.1
    host2:
      group: alpine
      mgmt-ipv4: 172.20.20.22
      exec:
      - ip addr add 10.1.200.10/24 dev eth1
      - ip route add 10.1.0.0/16 via 10.1.200.1
  links:
    - endpoints: [ "spine1:eth1", "leaf1:eth1" ]
    - endpoints: [ "spine1:eth2", "leaf2:eth1" ]
    - endpoints: [ "spine2:eth1", "leaf1:eth2" ]
    - endpoints: [ "spine2:eth2", "leaf2:eth2" ]
    - endpoints: [ "host1:eth1", "leaf1:eth3" ]
    - endpoints: [ "host2:eth1", "leaf2:eth3" ]
links.Initial Deployment
Now the lab can be started using the deploy command:
[*]─[LAPTOP]─[~/labs]
└──> clab deploy -t apstra-ceos.clab.yml
Containerlab will first start the cEOS nodes and Linux test hosts, as well as establish connections between them. Once the 180-second startup-delay for the Apstra VM has elapsed, it will also start.
In my setup, it takes about 2–3 minutes for Apstra to boot up and be marked as healthy. You can check and track the process using docker logs -f <apstra-container-id>. In the end, it should look something like this:
DEBUG Starting vrnetlab Apstra
DEBUG VMs: [<__main__.Apstra_vm object at 0x76446b9cbfb0>]
DEBUG VM not started; starting!
[...]
INFO Launching Apstra_vm arch x86_64 with 4 SMP/VCPU and 16384 M of RAM
INFO Scrapli: Disabled
INFO Transparent mgmt interface: Enabled
DEBUG number of provisioned data plane interfaces is 0
DEBUG qemu cmd: qemu-system-x86_64 -enable-kvm -display none -machine pc -chardev socket,id=monitor0,host=::,port=4000,server=on,wait=off -monitor chardev:monitor0 -chardev socket,id=serial0,host=::,port=5000,server=on,wait=off,telnet=on -serial chardev:serial0 -m 16384 -cpu host -smp 4 -drive if=ide,file=/config/apstra_overlay.qcow2 -device virtio-net-pci,netdev=p00,mac=0C:00:ca:bb:42:00 -netdev tap,id=p00,ifname=tap0,script=/etc/tc-tap-mgmt-ifup,downscript=no
DEBUG Apstra login prompt detected
INFO Startup complete in: 0:02:07.325491
docker exec -it <apstra-container-id> telnet 127.0.0.1 5000
When logging in for the first time with the default credentials admin:admin, Apstra runs the initial configuration dialog, in which you set the CLI password, configure the MGMT interface, and finally set the password for the web UI:
┌─────────┤ Apstra Server first boot configuration tool (aos-config) ├─────────┐
│                                                                              │
│  1 Local credentials    Manage password for the default user (admin)         │
│  2 WebUI credentials    Manage password for the default Apstra UI user (adm  │
│  3 Network              Manage network configuration (e.g.: IP address, def  │
│  4 IP addressing mode   Set AOS internal IP addressing mode (IPv4 or IPv6)   │
│  5 Apstra service       Enable or Disable Apstra service                     │
│  6 Set SSRN             Set Software Support Reference Number                │
│                                                                              │
│                     <Ok>                         <Cancel>                    │
│                                                                              │
└──────────────────────────────────────────────────────────────────────────────┘
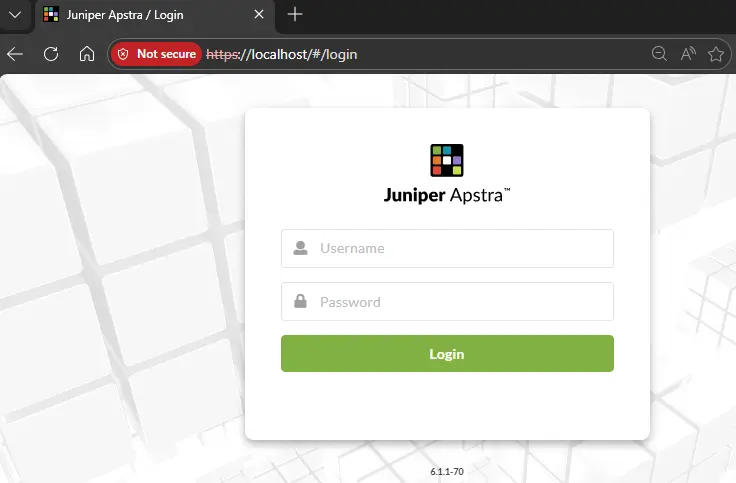
172.20.20.10.Once all settings have been configured, you can log in to the web UI for the first time. To do this, simply open any browser on your Windows host and enter https://localhost in the address bar. Since we have exposed the Apstra VM’s HTTP/HTTPS ports in the CLAB file at the WSL level, we can now access the Apstra frontend directly. Log in using the user admin and the previously defined Web UI password.
Device Onboarding
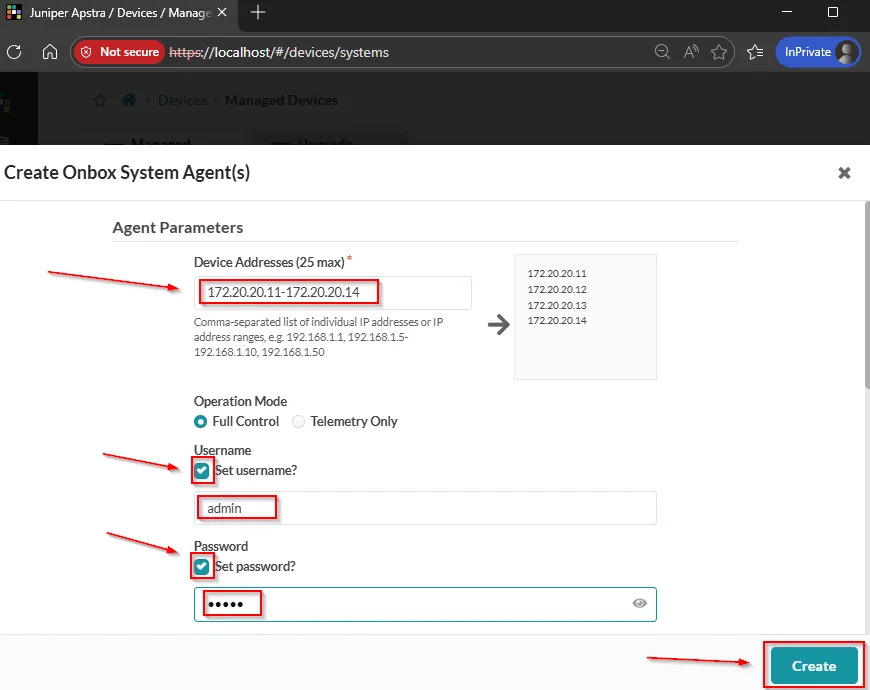
Next, we can onboard the individual Arista cEOS nodes that will form our DC fabric. To do this, we navigate to the “Devices” > “Managed Devices” menu item in Apstra and click “Create Onbox Agent(s)”
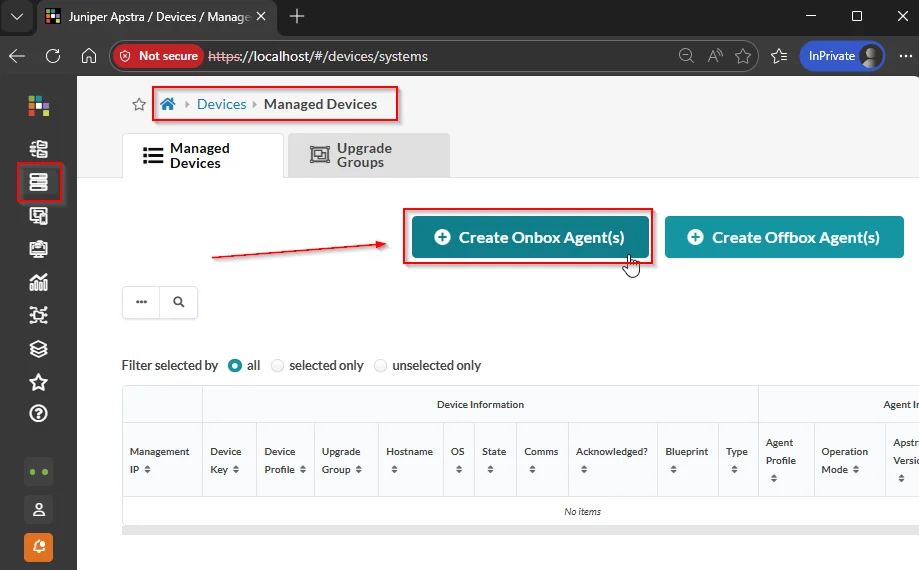
172.20.20.11 - 172.20.20.14—as well as the default admin credentials admin:admin for system access via SSH.
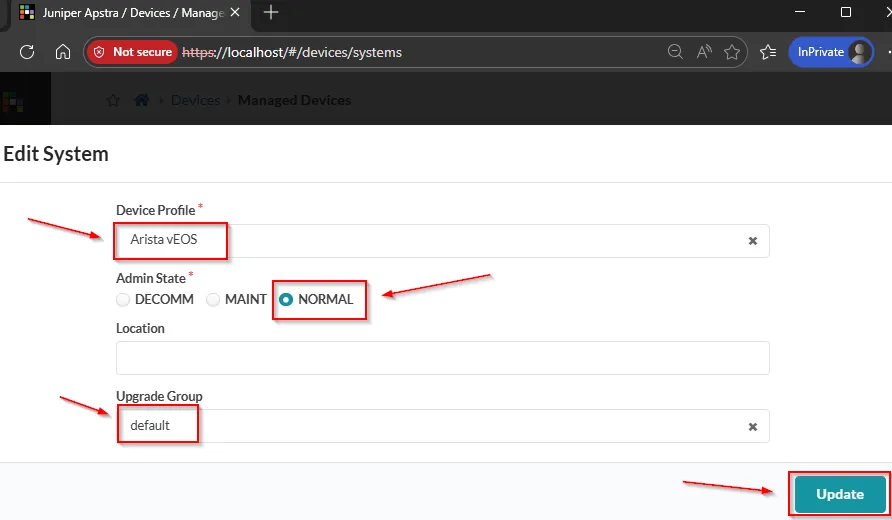
startup-config: ceos-custom.conf contains a slightly modified version of the default configuration, but it meets all requirements for Apstra onboarding.Once the agent jobs have completed successfully, a small manual adjustment must be made for each device via the Managed Devices overview page. Since Apstra does not appear to automatically recognize the device profiles of the cEOS nodes, you must manually select or enter the following parameters by clicking on the MGMT-IP and Edit System:
- Device Profile: Arista vEOS
- Admin State: Normal
- Upgrade Group: default
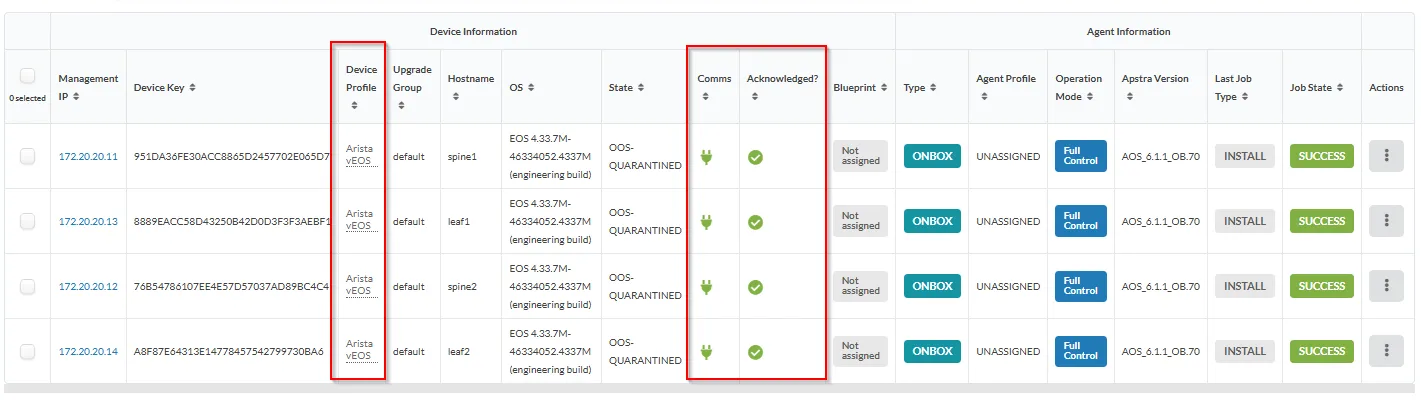 The most important things here are the correct Device Profile type Arista vEOS, as well as the Comms/Acknowledged values marked in green.
Fabric Deployment
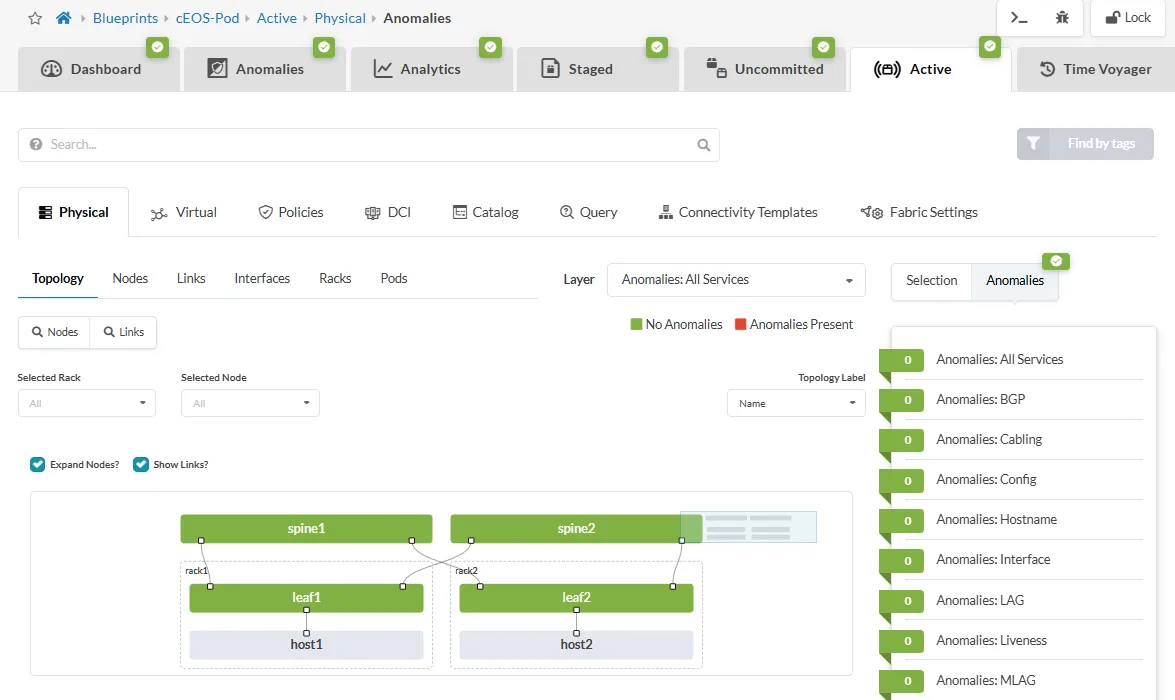
Now that the cEOS nodes are fully integrated, the next step is to create and configure the desired Blueprint in Apstra. For my example setup, I’m choosing a 3-stage Clos EVPN/VXLAN fabric in accordance with the Apstra Standard DC reference architecture.
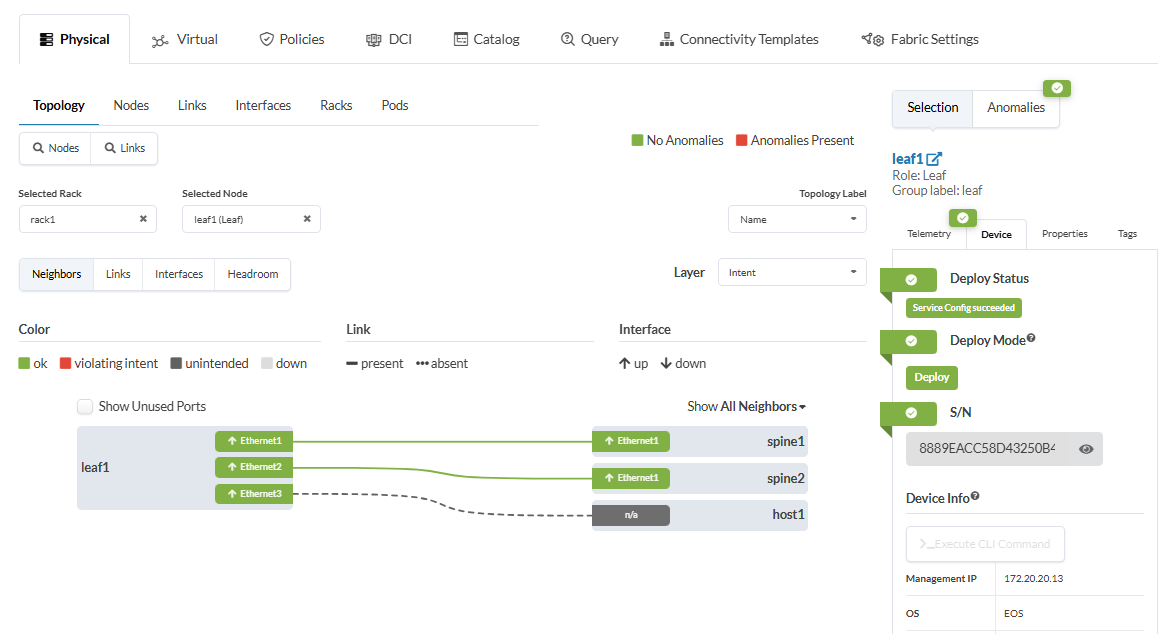
Afterwards, you can track the status in the Active tab. If all probes are green and no anomalies occur, then the intent has been successfully deployed. The overall overview should then look like this:
The example of the Leaf-1 node clearly shows that both the spine uplinks are active and configured according to the intent, as well as the port to Host-1:
End-to-End Connectivity
In my example setup, the two test hosts are connected to different subnets within the same tenant/VRF. I have already defined the host-side IP and routing settings in the Containerlab topology file using the exec parameter, so that the corresponding commands are executed immediately when the containers start
- Host1: 10.1.100.10/24 - Gateway: 10.1.100.1
- Host2: 10.1.200.10/24 - Gateway: 10.1.200.1
With this setup, I want to demonstrate that the necessary inter-subnet routing must be performed via the cEOS fabric using anycast gateways. I have already defined the necessary components, such as *routing zone, virtual networks, and connectivity templates in the blueprint, so that the final end-to-end reachability test between the hosts can be performed:
/# ip addr | grep eth1
28: eth1@if29: <BROADCAST,MULTICAST,UP,LOWER_UP,M-DOWN> mtu 9500 qdisc noqueue state UP
    inet 10.1.100.10/24 scope global eth1

/# ping 10.1.200.10
PING 10.1.200.10 (10.1.200.10): 56 data bytes
64 bytes from 10.1.200.10: seq=0 ttl=62 time=4.972 ms
64 bytes from 10.1.200.10: seq=1 ttl=62 time=2.946 ms
64 bytes from 10.1.200.10: seq=2 ttl=62 time=3.982 ms
^C
--- 10.1.200.10 ping statistics ---
3 packets transmitted, 3 packets received, 0% packet loss
round-trip min/avg/max = 2.946/3.966/4.972 ms
docker exec -it <host1-container-id> sh or via the Containerlab VS Code extension -> “Attach Shell”A look at the EVPN table of cEOS-Leaf1 also shows that corresponding EVPN routes of Type-2, -3, and -5 are successfully exchanged between the nodes:
leaf1#sh bgp evpn
BGP routing table information for VRF default
Router identifier 203.0.113.2, local AS number 64514
Route status codes: * - valid, > - active, S - Stale, E - ECMP head, e - ECMP
                    c - Contributing to ECMP, % - Pending best path selection
Origin codes: i - IGP, e - EGP, ? - incomplete
AS Path Attributes: Or-ID - Originator ID, C-LST - Cluster List, LL Nexthop - Link Local Nexthop

          Network                Next Hop              Metric  LocPref Weight  Path
 * >      RD: 203.0.113.2:100 mac-ip 001c.7300.0001
                                 192.168.0.0           -       -       0       i
          RD: 203.0.113.3:200 mac-ip 001c.7300.0001
                                 192.168.0.0           -       100     0       64513 64515 i
          RD: 203.0.113.3:200 mac-ip 001c.7300.0001
                                 192.168.0.0           -       100     0       64512 64515 i
 * >Ec    RD: 203.0.113.3:200 mac-ip aac1.ab98.af7a
                                 192.168.0.1           -       100     0       64513 64515 i
 *  ec    RD: 203.0.113.3:200 mac-ip aac1.ab98.af7a
                                 192.168.0.1           -       100     0       64512 64515 i
 * >Ec    RD: 203.0.113.3:200 mac-ip aac1.ab98.af7a 10.1.200.10
                                 192.168.0.1           -       100     0       64513 64515 i
 *  ec    RD: 203.0.113.3:200 mac-ip aac1.ab98.af7a 10.1.200.10
                                 192.168.0.1           -       100     0       64512 64515 i
 * >      RD: 203.0.113.2:100 imet 192.168.0.0
                                 -                     -       -       0       i
 * >Ec    RD: 203.0.113.3:200 imet 192.168.0.0
                                 192.168.0.1           -       100     0       64513 64515 i
 *  ec    RD: 203.0.113.3:200 imet 192.168.0.0
                                 192.168.0.1           -       100     0       64512 64515 i
 * >Ec    RD: 203.0.113.3:200 imet 192.168.0.1
                                 192.168.0.1           -       100     0       64513 64515 i
 *  ec    RD: 203.0.113.3:200 imet 192.168.0.1
                                 192.168.0.1           -       100     0       64512 64515 i
 * >      RD: 203.0.113.2:100 imet 192.168.0.2
                                 -                     -       -       0       i
 * >      RD: 203.0.113.2:10 ip-prefix 10.1.100.0/24
Preserving the lab state
If you’re wondering whether you have to keep your laptop running indefinitely to preserve the state of the lab and the Apstra VM, I can reassure you.
The Apstra image we created via the Custom Build folder for vrnetlab uses a persistent overlay image. This means that for each Apstra node, an individual QCOW2 overlay image is automatically created and persistently saved on the Containerlab host. The image can be found at the following path:
<lab-name>/
└── <apstra-node-name>/
    └── config/
        └── apstra_overlay.qcow2   ← Persistent Overlay Image
This makes it possible to simply stop Labs after use with clab destroy and restart them later with the same state using clab deploy.
Conclusion
In this rather long and comprehensive blog post, I have essentially documented a process spanning several weeks - from the initial idea of using a small Apstra-managed DC fabric in Containerlab on a Windows laptop, all the way through to the final implementation and successful testing.
Even though only the finished and functioning end result is presented here, the journey was certainly marked by various setbacks, course corrections, and doubts. Ultimately, however, it is precisely these experiences that are important for personal growth, building new skills, and rising to the challenges - and admittedly, the whole thing was actually quite fun. 😊
I’m quite satisfied with the result, and I find it pretty impressive that it’s possible to run a fully Apstra-managed EVPN/VXLAN fabric consisting of four cEOS nodes on a Windows laptop with 32GB of RAM. 😎
Furthermore, the ability to use Apstra directly as part of the Containerlab topology opens up additional potential use cases. Especially as the DC topologies to be managed grow larger, including multi-pod setups with DCI, or when resource-hungry VM-based nodes (such as vJunosSwitch) are also used, a laptop quickly reaches its limits. But since the entire lab, including Apstra, is essentially portable, you can easily host it on Github Codespaces or in Clabernetes, thereby overcoming the limitations of your own laptop. 💡
If you’d like to try this out for yourself, you can currently use my personal vrnetlab branch with the Custom Apstra build folder, as long as the corresponding PR hasn’t been merged into the SRL-Labs vrnetlab repo. As always, the corresponding lab files can also be found in the Data Autobahn Labs on GitHub.